Comtech Research
Information & Installation videos for the Air Probe Sanitizer Ultraviolet-C Central Air purifier
| Phone orders: 866-466-4937 | NEWS |
![]() Testimonial Letters
Testimonial Letters
![]() Air Probe Sanitizer
Air Probe Sanitizer
![]() Commercial units
Commercial units
![]() FanHandler
FanHandler
![]() Ionizer products
Ionizer products
![]() Ordering info
Ordering info
![]() Contact Us
Contact Us
![]() Site Map
Site Map
![]() Search
Search
![]() Back
Back
|
Clarifications to the Air Probe Sanitizer video |
|
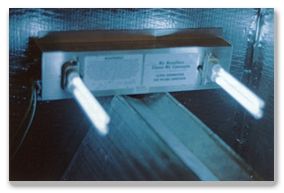
At the time the video was made, some of the ways that UV-C helped destroy dust, odors, and volatile organic compounds (VOC's) were not clearly understood. Hydroxyl ions are not mentioned, only negative ions. You can read about hydroxyl here. The "Flush Mount" unit: no reference is made in the video to a model number. The model FME-200 is briefly shown in the video. Also, the sockets are now mounted 90 degrees to the position shown on the FME-200 in the video. The current design FME-200 is correctly shown on the web site photos. References to 120 volts and step-down transformers are now all but obsolete. The latest design Air Probe Sanitizers now have an electronic ballast which automatically adjusts the current for any input voltage between 103 volts and 280 volts. The slot size mentioned for the model T-200 is 4" x 17". We suggest that the slot length be about 15" and not 17", as the standard model is 17" long. It is recommended that any existing wires (that may not have UV-resistant insulation) be covered with something to prevent deterioration over time by the UV rays, such as duct tape or black split loom tubing. You should also read and follow the instructions that we include with each Air Probe Sanitizer. |
1. Introduction and Informational videos about the Air Probe Sanitizer
Click a link below to see and hear the inventor describe the UV-C air purifier in this no-nonsense, no-hype informational video.
2. Air Probe Sanitizer Installation Videos
After viewing the intro videos above, click on a link below to see and hear how to install the UV-C Air Probe Sanitizer in different typical installations*.
![]() YouTube
Residential
Installation video
YouTube
Residential
Installation video
![]() Commercial
installation (large buildings)
Commercial
installation (large buildings)
* NOTE: the installation of these air purification products, as easy as it may look on the video, should be performed only by a heating and air conditioning professional (or equivalent).
IMPORTANT
INSTALLATION
NOTESThese very important points may not be apparent from watching the video:
1. The units MUST be installed DOWNSTREAM on the COLD AIR SIDE of the air conditioner cooling coil (the evaporator or A-coil, if one exists)!
The reasons: if they were installed on the inlet side of the cooling coil instead of the side where the cooled air exits, negative hydroxyl ions would be trapped by the coil fins instead of exiting out of the duct vents in the rooms. Also, mold and mildew growth would not be as effectively controlled.2. The units must ALSO be installed close to the coil so that the UV light shines on as much of the coil and condensate drain pan as possible. The reason: the cooling coil and condensate (water) catch pan is where mold, slime, and bacteria normally grows, and the UV light has to shine on the coil in order to prevent this and keep the coil clean and the air pure.
The installations shown in the installation video are upflow systems, and the units are downstream (on the cooled air side) of the coils. if you are installing them in a downflow system, you cannot place them as shown in the video. In that case, they might be installed in the plenum below the cooling coil rather than as shown. There are other installation methods and different models for this.
After installation, the power to the Air Probe Sanitizer should remain on to avoid shortening the life of the UV lamps.
The enclosed normally-open cover switch should be installed so that power to the Air Probe Sanitizer is removed when the access panel (if any) is opened.
These videos load quickly and have good picture and sound quality regardless of your Internet connection type.
Older Videos for slow Internet connections:
The RealPlayer videos are usually superior and preferred
over Windows Media Player. To view
the RealPlayer streaming videos, you must have RealPlayer® installed on your computer.
Most people already have it installed. If you don't...
![]() Download RealPlayer® (Free download)
Download RealPlayer® (Free download)
Choose either RealPlayer® (best quality) or Windows Media Player (lower quality) streaming video format.
![]() RealPlayer Video:
RealPlayer Video:
High-speed Internet connection (Cable modem or DSL)
![]() RealPlayer Video:
RealPlayer Video:
Dial-up 56K modem
Download the above video to your computer, for playback later.
![]() Windows Media Player
Video: Introduction video
(56K dial-up)
Windows Media Player
Video: Introduction video
(56K dial-up)
A VHS or DVD training video is also available. The videos on this page were taken directly from this video, so you do not need a tape or DVD unless you cannot view any of the video presentations on this page for some reason.
![]() RealPlayer video:
RealPlayer video:
High-Speed Internet connection (Cable modem, DSL)
![]() RealPlayer video:
RealPlayer video:
Dial-up 56K modem
Download the above video to your computer for playback later.
![]() Windows Media Player
Video: Installation
video (56K dial-up)
Windows Media Player
Video: Installation
video (56K dial-up)
No high-bandwidth Windows Media Player videos are available.
Sorry, our video guy did create them for us, but they are not only enormously huge files (90 to 155
megabytes), but they are not near the quality of the RealPlayer files above.

02/05/16
